MathJax

31 August 2012

Chemistry and Biology in 3D

View Molecules in 3d

Sometimes, you need a "Wow" factor in class. In chemistry textbooks, pictures of typical molecules, even in colour, can be rather ho-hum. Fortunately, there are many websites where students can view and move around the molecules mentioned in class. However, you can take it up another notch. You can show your class these molecules in 3d.

My favorite molecule viewer is Jmol (which can be found at jmol.sourceforge.net). I won't go through a tutorial on how to use it; I will assume you can get the basics just by playing with it.  I do want to show one feature hidden deep in the options. You can display molecules in 3d

A use for those funny glasses

Of course, to see in 3d, you need those funny, two-colour glasses. If you don't have a set hanging around, a quick internet search will find you some.

Start Jmol and load your favorite molecule like below (bonus points if you can figure out what it is).


With your curser on the molecule (do not use any of the toolbar options), right-click and you will see the options below.


You will need to chose the appropriate options depending on the glasses you use. If you can get a classroom set and have a computer projector in your room, this is a "Wow" factor for your kids.

And also for Biology

You can also use this site to show your students DNA in 3d with the same impact.


You can do the same rotations and zooming that you can do with simple molecules. A neat tool to help students visualize these aspects of chemistry and biology.

The end of summer

The end of summer

For years, my summer Sunday evening routine involved sitting on the front porch, with a book and maybe some wine, watching the neighborhood kids being kids, and listening to the radio.  Until recently, Buffalo was blessed with two NPR stations.  With those stations, I had choices for my listening pleasure.  I could listen to This American Life, Living on Earth, Tech Nation, To the Best of Our Knowledge, and other intelligent programs.  They were a nice way to relax, but also to learn something. The Sunday evening before Labor Day became my "end of summer" ritual. The upcoming Sunday evenings will be spent grading papers, revising lessons, and the other chores of a typical teacher. The radio might be on, but I can't always listen as intently as I can during the summer. So I would experience a mindshift when I turned off the radio that final summer Sunday, when the quickening twilight reminded me that the days are shorter, that the routine of the school year was ahead.  It was an evening that I both dreaded and looked forward to.

This year, things changed. The two stations merged into one, with weekend programming becoming blues music. Those programs I like are no longer available at those times.  And listening to podcasts is not the same. There is a lose of immediacy, the feeling that if I don't listen now, I might miss something good. The current segment playing on the radio might not be too interesting, but the next one might be. For example, looking at the podcasts available for This American Life, I probably would think the episode with this description, "For Father's Day, stories about fathers going out of their way to protect their kids, and kids going out of their way to protect their fathers",would not be of interest to me, and I probably would not download it. However, since I had listened to that show live, I got to hear the tale of a single father trying to save his pre-teen daughter from disappointment. Even though she did not say it, I got the impression the daughter, in between her sighs, really appreciated her father showing how much he cared, a story best told via radio. It was tales like that that made my summer Sunday evenings a delight of discovery.

 So this year, as I sit on the porch, I will be listening not to the radio, but to a podcast, to programs that I have chosen. The shows will be just as enjoyable, but I will miss that feeling of child-like eagerness anticipating something completely unexpected coming from the radio.

29 August 2012

Crayons for Whiteboards

Crayons for High School Kids

Many high school physics teachers use Whiteboarding as a part of teaching.  While the boards last almost forever (try cleaning with foaming bathtub cleaner if they get grungy), the markers don't.  Students go through the traditional wet markers with little thought.  They leave the caps off while discussing; they mash the tips to cottonball consistency. Some teams spend more time trying to find a marker that works than they do in working on the task at hand.

Last year, a teacher at a meeting of the Western New York Physics Teachers Alliance told us about discovering Crayola Crayons for Whiteboards.  I bought a couple of boxes to try them out ($4 for 8 but only 5 colours usable).  Kids loved them, mostly because of the novelty.  But they lasted.  The trouble was that they were hard to find and still a little pricey.

This summer, as I was in a WalMart, I looked in the Back to School section, hoping to find the Crayolas cheaper than they were in Office Depot.  They weren't there but I did spot Cra-Z-Art washable jumbo crayons (16 for around $2, but only about 12 usable colors).  I bought a pack just to try out.  When I got into school, I did try them, and found they work just as well as the Crayolas.  They write well, and erase usually with a dry rag (I use cut-up old towels), but sometimes need a little bit of water or window cleaner to get all the writing off.


If you whiteboard a lot in class and are annoyed by the excessive use of traditional wet markers, WalMart's Cra-Z-Art washable crayons are worth a look. You will want to keep a set of the regular markers. The crayons write with a thin line that is hard to see across the room, so if you are having the students present there board to the entire class, you will want them to write with the wider markers.

09 August 2012

First days homework


Do you know how to measure?


Just checked the school calendar and saw that the first day of classes this year is a Thursday.  Perfect for what I like to do on the first couple of days.


How wide is your bedroom?


After the usual first day stuff (course structure, classroom expectations, etc), I hand out the first assignment.  Part I is to measure the width of a room three times with a one-foot ruler, then three times with a 12-foot (or longer) steel tape.  The next day we discuss how one can measure the same object with different instrument giving different results.  I then put one student's measurements up on the board and ask the question "Which one is the right width of the room?".  Usually most students will say that we don't know (and I try to get them to realize that we will never know the exact width).  Sometimes, someone will blurt out "the average".  Then the discussion leads to the idea that the arithmetic mean is more likely to be closest to the exact value that is any of the individual measurements. It will be the "best guess".

How tall is a car?


Part II of the assignment is to measure the height of a car and to write down how the measurement was done (I give no directions for this part).  The class discussion the next day starts first with me asking what is meant by the "height of a car".  It doesn't take long to draw it on the board.

Ruffling through the homework pile, I usually find one student's write-up which goes something like "I put one end of the tape measure on the ground and then run it up to the top".  I read it aloud and then draw that description on the board, running the marker along the outside of the car on the board
(sometimes getting "That's not what I meant!").  The lesson here is to write clear and precise directions.

I then ask if anyone directly measured that height.  We conclude that no one did because Mom or Dad would get mad if holes were drilled through the roof and the floor.  So everyone did an indirect measurement, a measurement of something that is related to the measurement we want. 

Most everyone did a variation on putting a long board on the top of the car, holding it level to the ground, and measuring the distance between the board and the ground.

All scientists make assumptions; good scientists realize when they do

"So, when you say that the height you actually measured is the same as the height of the car, you are making a basic assumption.  What is that assumption?"  It takes a while, but with leading questions and other hints, most see that the basic assumption is that they are setting up a rectangle. They are also using the property of rectangles that opposite sides have the same length.  At this point I like to remind my students that we are going to be using a lot of the geometry and algebra that they have learned in the math classes they have had already.

Very good scientists ask if the assumptions have validity

"So, convince me that you set up a rectangle."  Again, it takes a little bit to get the class to realize that there needs to be at least 3 right angles.  It then boils down to having level ground and to holding the board parallel to the ground.  All of this is to get students to realize that the act of measuring is more than just reading numbers off a device.

Now, measure the height of a tree
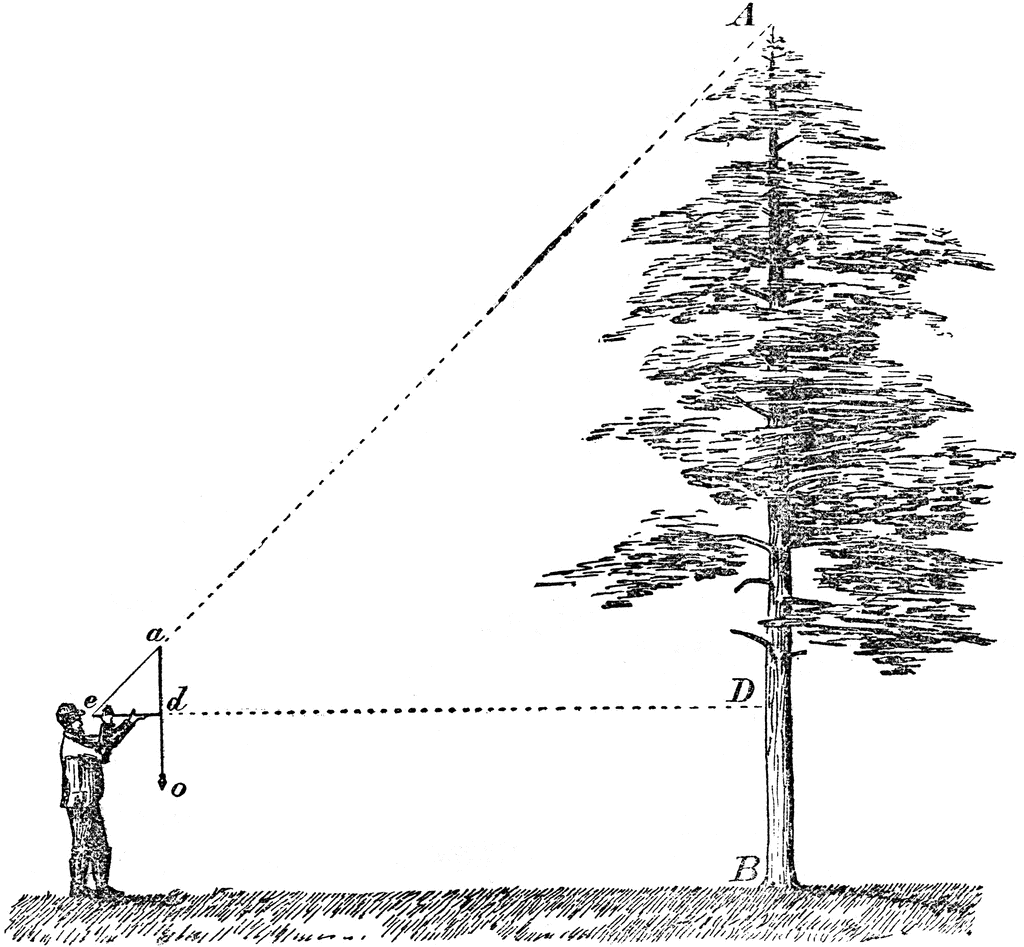
The class wraps up with setting up the next homework assignment which I time for a weekend.  I demonstrate in front of the class (at least twice) the forester's technique to measure the height of a tree. You can see this technique here (the first shown).  Whether students measure the height of a tree, a church steeple, a house, or other tall object is immaterial.  What is important is an explanation of why the technique works and what assumptions are made.  I emphasize that they already know why it works, they just need to think about it. The grading of that assignment is based on a complete and logical explanation.

Most students will realize that it relies on making an isosceles right triangle, but few will see that it really uses two geometrically similar isosceles triangles. I usually have to ask some leading questions in class, my favorite is "Is this enough to show the tree height?". During our in-class discussion, I ask if we have used any new mathematics that they have never seen before. Of course, the answer is "no". I then tell the class (for probably the third time) that they already know the math they need for this class; they just have to think about when they need to use it. This sets one of my expectations for this course; I expect you to remember the important math you have learned in other classes. It will be expected in college.

Just thought of this modification for my AP class.
For my AP students, I have them measure the distance from the starting point to the tree base by pacing (I have my regular physics class measure that distance using a long steel or cloth measuring tape).  So we spend time in class getting a personal pace calibration curve.  In other words, they make a plot of distance paced vs. number of steps using the practice football field right outside our building.  One reason I like to use the marked field is that the hash marks are 5 yards apart so my students have to make some estimations about where their foot is. They get a calibration equation from the best-fit line which is used to get the actual distance paced in feet or meters. Since graphing data and getting a best-fit line is often asked on the AP Exam, this practice starts them with something which already be linear.  


These two assignments try to get students to realize that the act of measuring is not a simple one.  Much thought should go into all aspects of the procedure and that many times subtle assumptions are made, the validity of which needs be examined.  And as with any important lesson, it will have to be repeated many times over the school year.

If I have time at the end of the year, I like to revisit this lab by measuring the height of a "mountain".